Hardware Wiring
Connecting Actors
Fist question you have to answer is how you would like to connect your actors like heaters, agitator, pumps, valves etc
Plain GPIO + Reails
You will connect a Solid State Relais (SSR) or relay boards to RPi GPIO Pins. Knowledge about electric wiring required
Gembrid USB Socket
The Gembird USB Socket will just connected via USB
WIFI Socket
Switch your actors wireless
PiFace Shield + Relais
The PiFace Shield offers screw terminals for an easy connecton of actors
Parts list
- Raspberry Pi (all models is supported)
- 1 x 1-wire Temperatursensor DS1820 Waterproof! + Thermowell stainless steel
- 1 x 4.7k Ohm Resistor
- Jumper Cable
- Solid-State Relais XURUI + Heatsink KAB-60 (for each actor you need one relay)
Wiring with GPIO and Solid State Relay DS18B20 Temperature Sensors
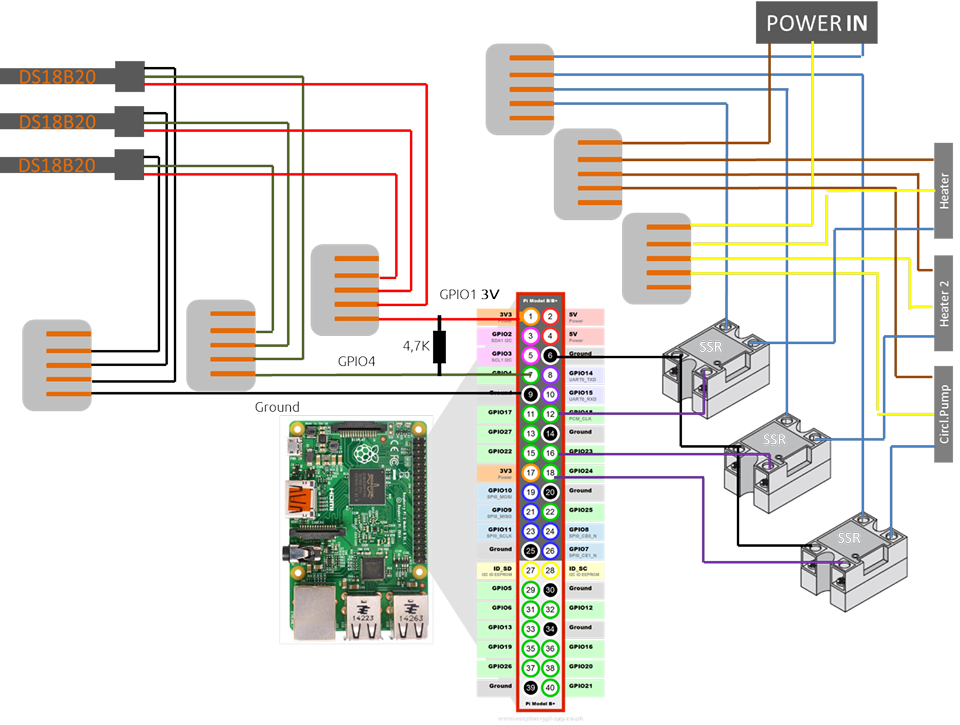
SAFETY WARNING: Mains Voltage kills. This has to be constructed only by skilled people with knowledge of safety requirements. Never leave the system unattended.
Wiring with CraftBeerPi Extension Board
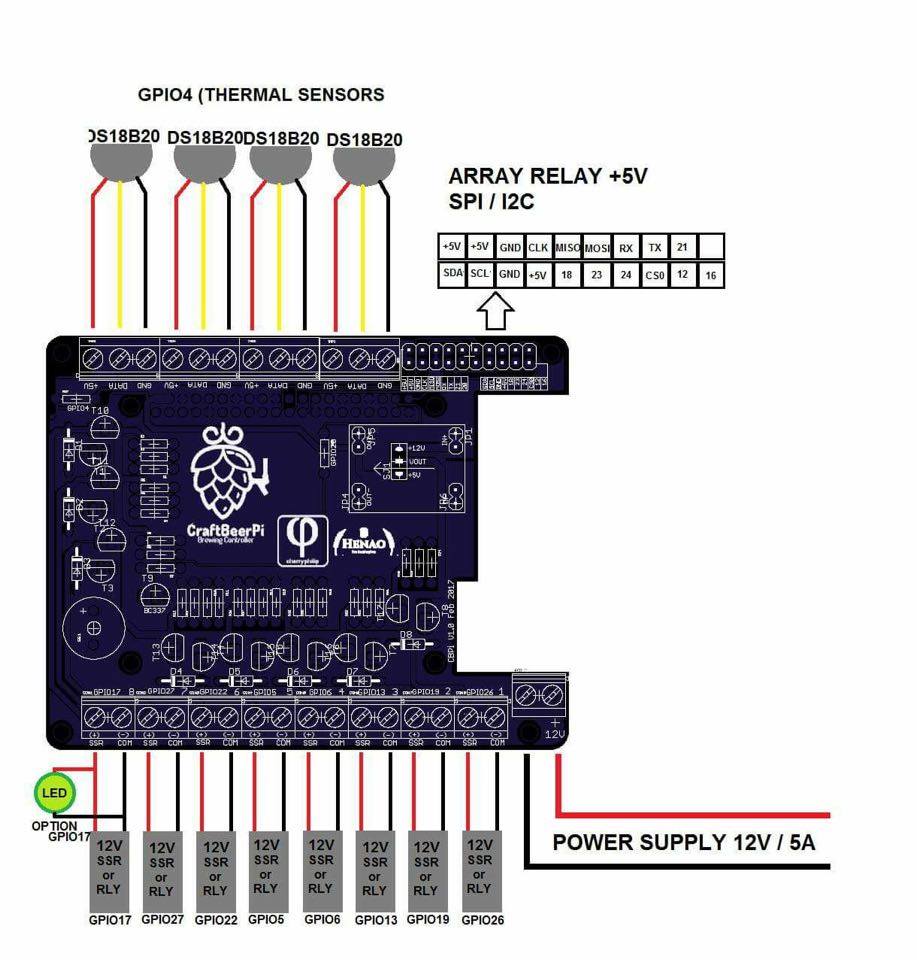
This is an extension shield you put on your existing Raspberry Pi.
Temperature Sensor
CraftBeerPi is supporting DS18B20 temperature sensors. Theses sensors are connected via a 1-Wire bus. The bus can handle up to 10 temperature sensors. The sensors are put into a Stainless Steel Thermowell with ½” BSP or NPS fitting. By default the GPIO4 is used for the 1-Wire Bus. Between GPIO4 pin and 3V pin a 4,7k Ohm resistor need to place. All temp sensors are connected parallel. Each sensor needs to be connected with three wires: GND, DATA and VDD
Trouble Shooting
Check if the temperature sensors are found by the Raspberry Pi OS. For each sensor a folder get created under /sys/bus/w1/devices on the Raspberry Pi. The folder name is the sensor id. Sensors of type DS1820 and DS18S20 have the family code 10, DS18B20 have the Code 28 and DS1822 the 22.
cd /sys/bus/w1/devices
cd 10-000801b5*
cat w1_slave

0f 00 4b 46 ff ff 06 10 0c : crc=0c YES
0f 00 4b 46 ff ff 06 10 0c t=7375
Relays
Solid State Relays
If you like to control hardware which requires a higher load than 10A than you have to go with a Solid State Relay (SSR). The SSR can handle up to 40A. It’s important to have a heat sink when using the SSR. You can find these SSR also at eBay. It’s important to have a SSR with DC 3-32V control voltage be the GPIO pin of a Raspberry Pi is providing 3.3V. For each actor (heater, pump, agiator,..) you need one relay. The wring is very simple. Just connect the GPIO pin and the GND pin with the relay (see picture)
Relay boards
These relay boards can be found on eBay. Just search for Raspberry Pi relay board Also connecting is quite simple. You just have to connect the GND, 5V and your favorite GPIO pin (GPIO 17,18,19…) These relay board can typical handle up to 10A each. Furthermore they cannot be used for PID control logic. In CraftBeerPi you have to configure “inverted” switch for these relays.
Touchscreen
For Raspberry Pi a 7” touch screen (800x600) is available. This touch screen can be connected with just 2 cables via the GPIO Pins and flat-band cable. The advantage is that it doesn’t require and external power supply.
A Raspberry Pi 3 is recommended if you are running the user interface on the Pi.
Piezo Buzzer
A Piezo Buzzer is use to give acoustic singles during the brewing process. For example CraftBeerPi will inform you when the step is finished and the next brewing step is started. Make sure that the buzzer runs with 3.3V. Connect the buzzer with the GPIO 25 and and GND pin of your raspberry pi.
You can configure a different GPIO in the CraftBeerPi Config via the web interface.